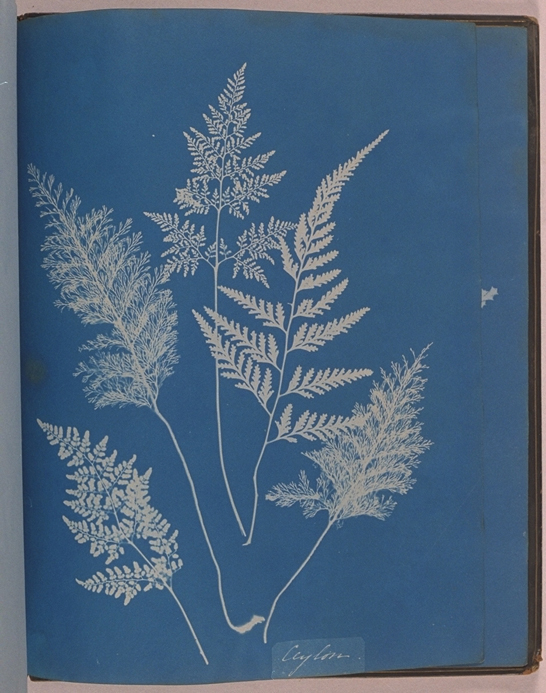
These iron salts, when exposed to natural or artificial ultraviolet light, are reduced to their ferrous state, producing a high contrast blue image when oxidised. Oxidation is hastened by immersion in running water, which also washes away the unused iron salts.
The process was eminently suited to its traditional role in reproducing technical drawings, its most common use in engineering and architecture until the advent of modern photocopiers. However, it was a versatile process, and was used throughout the 19th century from Anna Atkins’ photograms of plants and seaweed for her books on botany (1843–55) to Henri LeSecq’s still life studies of the 1850s. Photographers at the end of the century used cyanotype paper for proofing negatives.

The process
Solution A: 6.5 grams ferric ammonium citrate (green) in distilled water to make 25ml total
Solution B: 2.3 grams potassium ferricyanide in distilled water to make 25ml total
Note: Today, distilled water is known as ‘purified water’. Store separately in brown glass bottles, away from light. Filter before use, and mix in equal proportions A to B.
Paper
Suitable for many types of art papers. Try a good quality printmaking/drawing paper like Fabriano 5. Coat in subdued tungsten light, and dry away from light and heat. Print by contact (in a printing frame with a full-sized negative) in sunlight or by a mercury vapour lamp until the shadows look bronzed. Exposure should be at least one stop more than required. Develop by immersing in running water, and wash until the chartreuse stain of the ferric ammonium citrate has completely disappeared. Overwashing will erode the image. A 3% bath of hydrogen peroxide will speed up oxidation. A few drops of bichromate added to wash water will increase contrast and can appear to intensify the printed image. Avoid hydrochloric acid ‘intensifier’—the acid can combine with the cyanotype solution to produce cyanide gas.
Working with the cyanotype process
Setting up (preparation)
Working area
1. Lighting for working: avoid daylight and fluorescent lighting, use low level tungsten light and limit total exposure. Working surfaces: clean, and covered: newspapers, paper towels
Sensitising
Mixing chemical solutions
2. Measuring: clean dry paper for weighing dry chemicals, clean containers for measuring liquids
3. Labelling: identify, give proportions, date
Coating chemical solutions
4. Tape down paper
5. Brushes: Buckle’s brush for smooth dense paper, soft hair brush for rough, porous paper or cloth; Glass rod: for smooth, even coatings; Roller: foam for cloth
6&7. Coating with a brush—use horizontal and vertical brush strokes
8&9. Coating with a glass rod: use syringe to distribute solution; draw solution top to bottom
Drying
10. Drying: line and clothes pegs, boards or Perspex. Floor surface: protect with newspapers
Storage
11. Protect from light, heat, damp. Limit duration of storage before exposure—the coating will oxidise, and highlights will degrade
Exposure
12. Printing frames: traditional, home-made with bull clips, perspex, bubble wrap, melamine
13. Negative: beware chemical build-up on negative—protect with mylar sheet or cling film
14. Step wedge for timing. Basic guide: 125 watt uv lamp at 18” = 30 min. Timing variations: humidity, build up of heat
16. Exposed print
Development
17. In photographic tray, cold running water
Fix
18. Oxidation ‘fixes’ the print
Drying
19. Hang on line or flatten against tilted, waterproof surface. To coat paper, try one of the following:
- A soft, broad brush (separate brushes for different processes)
- A ‘Buckle’s brush’: cotton wool tied with string—the string is pulled through a glass or plastic tube so that the cotton wad forms a tuft at one end. This avoids the problem of contamination, as the cotton wool is discarded after each sensitisation.
- A glass rod—use a dropper or syringe to draw a line of sensitiser along the top of the rod. Hop the rod over the line and slowly draw down the paper to the bottom. Hop, then gently push to the top.
Repeat until coated. Always tape the paper down to the table surface before coating.
Toning
Gallic-iron
Purple/lilac
- Bleach print in 5% solution of ammonium hydroxide
- Wash thoroughly and let dry to allow ammonia to evaporate
- Tone in saturated solution of 1% gallic acid or 20% tannic acid
- Wash, and dry quickly
- For a violet tinge, immerse in cold solution of borax
Brown/black
- Bleach 10ml of 18% solution ammonium hydroxide 100ml distilled water
- Toning: 10g tannic acid
- 500ml distilled water
Avoid use of sulphuric acid for greenish prints—combination with cyanotype solution may result in formation of cyanide gas.
Useful resources
- Anna Atkins in the Science Museum Group Collection
- Louis Philippe Clerc, Photography: Theory and Practice, edited by Andor Kraszna-Krausz (London: Focal Press, 1954)
- William Crawford, The Keepers of Light: A History and Working Guide to Early Photographic Processes (New York: Morgan & Morgan, 1979)
- Nancy Howell-Koehler, Photo-Art Processes (Worcester, Massachusetts: Davis Publishers, 1980)
- Bernard E. Jones, The Cyclopedia of Photography (London: Cassell Ltd, 1911)
- C. B. Neblette, Photography, Its Materials and Processes (New York: D. Van Nostrand Co., 1953)
- Catharine Reeve and Marilyn Sward, The New Photography: A Guide to Images, Processes and Display Techniques for Photographers, (Upper Saddle River, New Jersey: Prentice Hall Inc., 1984)
- Larry Schaaf, ‘Anna Atkins’ Cyanotypes: An Experiment in Photographic Publishing’, History of Photography 6 (1982)
- Larry Schaaf, Sun Gardens: Victorian Photographs by Anna Atkins (New York: Aperture Books, 1985)
- John Towler, The Silver Sunbeam: A Practical and Theoretical Textbook on Sun Drawing and Photographic Printing (1879) (Whitefish, Massachusetts: Kessinger, 2010)
- E J Wall and Franklin I Jordan, Photographic Facts and Formulas (Boston: Amphoto, 1947)
Brilliant overview – very clear and accessible, Thank-you
How do you dispose of the cyanotype chemicals after developing the print? Is there an environmental risk?